Showing posts with label 2 Crafty. Show all posts

Monday, April 16, 2012

A touch of red black and white...

A new week is upon us. It's hard to believe we are already half way through April!

This week I bring you some more of the lovely Jenni Bowlin range. This range works so well with so many of my photos at the moment! My adorable little munchkin nephew features again this week, along with my beautiful sister (also his god mother). I went crazy with the layering in this one!


To pick up the supplies for this page, visit the Scraploot online store.


Here are a few more close ups for you...


I hope you've enjoyed this week's installment from me. Don't forget to keep your eyes peeled this month... It’s oScraploot's 6th birthday, so don’t forget to check out the specials and the sketch challenge is still on, so get scrapping and have a go.

Enjoy your week and Happy Scrapping!

xx Renae

Thursday, March 08, 2012

Single or double???

So it has been a little quiet around here lately... but I'm back to it all now and thought that I would share some inspirational pages from Sue today.
Sue has created 2 pages, which could easily be viewed as a double page, or as two separate pages.

 Sue has worked with a great collection, My Minds Eye Mischievous Collection. This collection was created with a Halloween theme but is absolutely fantastic for boy layouts.

To recreate these pages, head on over to the Scraploot store and pick up the following;

Thursday, February 16, 2012

You & I - Lily Bee Head Over Heels Step by Step

A late post tonight, as I've been unwelll for a couple of days, but want to share this cute little layout with you, using the Lily Bee Head Over Heels collection, along with the We R Memory Keepers Sew Easy tool.
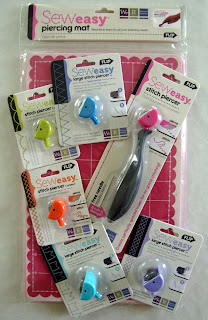
 The We R Memory Keepers Sew Easy has been on the market for a little while now, and WRMK have just kept on bringing out different interchangeable heads for this tool making it really versatile. For today's project however, I decided to use just the original head that comes with the main tool. The WRMK Sew Easy also comes with a needle, which has its own nifty hiding hole, in the handle, so you never have to search for another needle. You can see it in the picture below.

 To create the base of my layout, I used my Marvy Scalloped Circle punch, and randomly punched some circles from my Lily Head Over Heels patterned papers. I adhered these scalloped circles in a 3x3 Grid.
 Using the Sew Easy Mat, I layed my layout onto it and used the grid lines on the mat to guide where I would roll my sew easy tool. I can't believe how quick and easy the Sew Easy Tool made piercing the holes ready to be handstitched. I just rolled the tool along my cardstock with only a small amount of pressure.
 The picture below, shows how well the Sew Easy pierces the holes, there was no need to go and repierce them.
Using the needle provided and some embroidery thread from my stash I handstitched along the lines which I had pierced with the Sew Easy tool. I had created a lined grid between the punched scalloped circles.

 Below, is my layout with all the stitching complete. I like how it just adds a little more visual interest and texture to my layout.
To finish off my layout, I added my photos, some 2 Crafty Chipboard Heart Banners which were inked and spritzed with Glimmermist, and finished off with the remaining embroidery thread to tie the heart banners together.
 I hope you liked todays technique based step by step and give it a go. I think you will be seeing a bit more sewing my pages, as the Sew Easy makes it... well.... so easy to handstitch on my layouts.

Till next time, happy scrapping

Rach xo

Wednesday, February 15, 2012

Final whisper of Sweet Nothings....

Today's share comes to us from Sue with a fabulous heritage layout, with a great masculine feel to it.
To recreate this layout:
Green Tara Flowers Ivory 5cm & 7cm
Green Tara Roses Ivory
Birch Cluny Lace K07046 Natural
Martha Stewart Punch

Check back tomorrow for a step by step from Rachael using Lily Bee Head Over Heels Collection and the We R Memory Keepers Sew Easy Tool.


Friday, February 10, 2012

Weekend Scrapping Ideas & Cardstock Match Ups

Don't forget that the Scraploot Sketch challenge is now up and running.... get your scrappiness started for the weekend and have a go! There is a great prize up for grabs..... a $20 Scraploot Voucher.
Here is the beautiful sketch Rach designed.....
 And here is my take on it.....
And a few close ups....
 
If you want to recreate with these papers, head over to the Scraploot online store and pick up the following:
Echo Park A Boys Life Collection Kit
Doodlebug Twine Single Bubble Blue
Prima Flowers
Kaisercraft Flowers
Kaisercraft rhinestones
Trinket pins
2 Crafty Corner chipboard
And if you are looking for the perfect cardstock to match the Echo Park Boy's Life collection, here they are:
ASS 024 Apricot Cardstock
ASS 028 Butterscotch Cardstock
ASS 029 Mustard Cardstock
ASS 034 Vanilla Cardstock
ASS 035 Straw Cardstock
ASS 049 Moss Cardstock
ASS 067 Denim Cardstock
ASS 069 Graphite Cardstock
ASS 070 Charcoal Cardstock
Happy scrapping!!

xx Renae

Thursday, February 02, 2012

Point & Shoot

Another day, another post.... Lol. So over the past few weeks, we've seen what Renae has done with the Echo Park - Yours Truly Collection, well today we are going to check a layout created by Sue with this collection. Sue has used the papers to give a more masculine feel to her layout, and it just goes to show how versatile this collection really is.

Materials Used

Saturday, January 28, 2012

Mixed Up...

Here we are for a quick share today, to hopefully inspire you to get some scrapping done this weekend.
Today's layout has been designed by Sue and features her favourite Jenni Bowlin Red/Black Extension Collection. She has teamed this collection, along with a mixture of great products to create this stunning layout. You will find all the products you need at www.scraploot.com.au
Just click on each of the links below, which will take you to that exact item.
Materials List
Kaisercraft Rhinestone Strip - Black
Other: Pins - designers own

Till next time, happy scrapping

Wednesday, January 25, 2012

Lily Bee Head over Heels - Family 4 Ever

What a miserable day here in Sydney... but certainly great Scrapping weather. A while back I shared with you a layout using the Lily Bee Head Over Heels Collection, today I am going to share another one with you, this time not quite as girly but still a little bit feminine.
This photo was taken back in November on my birthday, and captures me with 2 of the most important people in my life... my boys. I love these two guys to the moon and back. Well I hope I have inspired you to get some scrapping done. To complete get your hands on the gorgeous product I've used in this layout, head on over to the Scraploot store by clicking here. Or to view each of the individual products used in this layout, just click on each of the supplies below;
Supplies
Cardstock - Stone
Lily Bee Head Over Heels Collection
- Courting Paper
- Dreamy Paper
- Flirt Paper
- Smitten Paper
- Mixed Cardstock Stickers
2 Crafty Maria's Frame
Bella Flowers Symphony - Aqua
Bella Flowers Harmony Pink

Till next time, Rach xo

Wednesday, January 04, 2012

Traditional Christmas

Over the weekend just passed, we were lucky enough to have Michelle showcasing the gorgeous new Christmas collection from October Afternoon, Holiday Style. To mix things up a little, today we are sharing a layout designed by Sue, using the same collection with a more vintage/heritage feel to it,  and also in the more traditional Christmas colours of red and green. I personally have been totally surprised at the variety that this collection brings, with traditional and brights there is something for everyone in this collection, and even better for you right now, the entire collection, along with the entire Scraploot online store everything is 20% off, up till January 8th. So be sure to pop on over to Scraploot and grab yourself some amazing savings.
So here is Sue's Cute Elves layout.....
Supply List
Cardstock: Leaf

Monday, December 05, 2011

Welcome to a new week!

Welcome to a new week and my Monday blog post. Today I bring you a step by step layout. Before you start, you will need to head over to the Scraploot online store to get all your goodies.

Here’s what you need:
Here’s what you need to do:

1.  Using your vanilla cardstock, ink the edges. Using a second piece of cardstock, cut a photo mat for your photo. Mat your 6” x 4” photo onto this photo mat.

2.  From the piece of “Tuxedo” paper, cut a 3” x 12” strip. Using the grey side up, distress and ink. Place 1cm from the left hand edge of the cardstock.

3.  Cut a 12” strip of the Green Tara Organza Rosette. Place 0.5cm from the left hand edge of your grey “Tuxedo” paper.

4.  From the piece of “Drama Mod” paper, cut a 9” x 7” rectangle. Using the grey/cream flower side up, distress and ink. This piece will sit against the right hand edge of your cardstock, centred from top to bottom.

5.  From the piece of “Tuxedo” paper, cut a 4” x 1.5” strip. Using the grey side up, distress and ink. Place this just under the bottom right edge of the “Drama Mod” piece of paper.

6.  From the piece of “Drama Mod” paper, cut a 8” x 2”. Using the cream side up, distress and ink. This piece will sit against the right hand edge of your cardstock, 1 cm down from the top of the “Drama Mod” flowered piece of paper.

7.  From the piece of “Tuxedo” paper, cut a 2.5” x 3” strip. Place this over the last piece of “Drama Mod” paper you placed down. It sits 1cm from the top and 1cm from the right of the piece of paper.

8.  From the Element Sticker Sheet, take the “I hope each and every day is beautiful….” Sticker and place it above your paper that sits against the right hand edge of the cardstock.

Take the “Happiness Is….” Sticker, ink the edges and place in the top left corner of the cream “Drama Mod” piece of paper from Step 6.

Take the “The best day ever” sticker, mount with Magic Mount and place at the bottom right of your page, over the grey “Tuxedo” paper from Step 5.

9.  Take your photo and stick Magic Mount on the back of it. Place this just off centre of your page. It sits 1” from the right hand edge of your cardstock and 4” from the top.    
10. Using your piece of chipboard, emboss with embossing powder. Adhere to the left bottom corner of your photo with Pritt Glue. 
11. Using small black flowers, glue 4 randomly on your chipboard piece. Stick some Kaisercraft pearls in the middle of these small black flowers.

12. Using the Basic Grey tissue flower, stick the pin to the bottom of it. I have peeled off the top 2 layers of the tissue paper as I didn't want it to sit as high. Place a medium black flower underneath the tissue paper flower, so the black just peeks out from under the tissue paper. Stick this bundle in the bottom corner of the chipboard flourish. Finish with the silver button from the Eclectic Embellishments pack.

13. Finish with 3 tiny Kaisercraft pearls on the grey piece of “Tuxedo” paper (the one under the top right of your photo).    

For a few of the finer points, here are a few close ups for you...

 This is the corner of the flourish with the tissue paper flower. 

 Another shot of the chipboard flourish.


The sticker pack used in various locations and in different ways on the page. 

I hope you have enjoyed this step by step guide. Don't forget to keep an eye out for more work from the DT this week.

Until next time, happy scrapping! 

xx Renae

Saturday, November 26, 2011

Drum Roll……

We are excited to announce and introduce you to our new Scraploot Design Team.
To celebrate this announcement of our new Scraploot Design Team, we are celebrating with a blog hop (all details at the end of the post), so that you can pop over to each of the girls blog and check them out... So without further ado, announcing;
Renae Woods
Renae Woods-1
Hi I'm Renae. I've been scrapping now for around 5 years. I live in Sydney with my gorgeous husband of almost 12 years, who features on many of my pages. I now also have a beautiful new nephew who is starting to creep into many of my pages! Fortunately family and friends know what an avid scrapper I am and how much I love my camera!
My camera is usually permanently attached to me at gatherings now so I can capture every moment!
I'm fortunate to have an amazingly creative outlet in scrapbooking and am just as fortunate to work in one of the beautiful parts of Sydney at Darling Harbour, where I am surrounded by the water and animals on a daily basis! After a crazy day at work, I love being able to retreat to my scrap area and create.
My scrapping style has changed over the years and I seem to have now settled on a blend of modern shabby chic. My work usually features plenty of distressing, inking and layering, not to mention flowers. I love my flowers!
I love scrapbooking and the wonderful friends I have met during my creative journey and I can't wait to meet plenty more!
Ruby Bisson
Ruby Bisson-1
My name is Ruby Bisson and I am 17 years old and reside in sunny Sydney. I have been scrapbooking and lurking online chat rooms and challenge blogs since I was 13 and have been hooked on the craft ever since! I have just finished high school and am looking into becoming an English teacher in the future. I have an art studio on my driveway- a little caravan draped with material and lanterns, complete with electricity for the hot days. I have a messy, colourful style- and believe that honestly- you can never have TOO much paint or colour. ;)
Michelle Winston
Michelle Winston-1
I am 38 years old, married to Brett, with two gorgeous sons - Jacob 11yrs and Caden 3 yrs. We live on Sydney's beautiful Northern Beaches, and when I'm not scrapbooking, I am a primary school teacher !
I have been scrapbooking for a number of years now, and I still love it ! I think I like shopping for new goodies most of all LOL ! I have been fortunate to work for a variety of challenge blogs, websites, stores and manufacturers, and I have been lucky enough to have my work published as well. I was named a Scrapbooking Memories Master for 2010, and have really enjoyed my "masters" year, this year.
I am very happy to be on the Scraploot DT, and can't wait to share lots of scrapping, tutorials and inspiration with you !
And of course you know us:
Rachael
Rach M4M-3
Sue
Sue-1
We would like to welcome Renae, Ruby and Michelle to the Scraploot Design Team. We are very excited to have them on board and can’t wait for these girls to start inspiring us week after week. We are sure you are going to love seeing what they come up with.
With the new Design Team, you are going to find lots of inspiration popping up on the blog each week, with regular posts from each of the girls, store updates, along with regular step by step layouts or techniques.
Behind the scenes, here at Scraploot we are planning lots of FUN things, along with some great challenges.
So enough chattering… Here is a project created by Sue, using the latest collection from Bo Bunny – Enchanted.
SCRAPLOOT 261111 Sue
Materials Used
-Cut Outs – Rose – Enchanted
 
To be a part of our blog hop and be in the running for some RAK, just drop by each of the DT blogs. When visiting each of the Design Teams blogs, look out for a letter within their post, in the colour RED. Once you have hopped by the four blogs and left some love on each, after collecting each of the RED letters, send an email to info@scraploot.com.au with the magic word, and your name, to be in the running for some goodies. All entries are to be received by Thursday, 1st December 2011 at 5pm.
Thanks for hopping by - now please hop on over to Renae’s blog, to get to know her a little better.
Just in case you get lost, here are the links in order for the Hop;
Renae
Ruby
Michelle
Rachael