Showing posts with label May Arts. Show all posts

Thursday, March 08, 2012

Single or double???

So it has been a little quiet around here lately... but I'm back to it all now and thought that I would share some inspirational pages from Sue today.
Sue has created 2 pages, which could easily be viewed as a double page, or as two separate pages.

 Sue has worked with a great collection, My Minds Eye Mischievous Collection. This collection was created with a Halloween theme but is absolutely fantastic for boy layouts.

To recreate these pages, head on over to the Scraploot store and pick up the following;

Thursday, February 02, 2012

Point & Shoot

Another day, another post.... Lol. So over the past few weeks, we've seen what Renae has done with the Echo Park - Yours Truly Collection, well today we are going to check a layout created by Sue with this collection. Sue has used the papers to give a more masculine feel to her layout, and it just goes to show how versatile this collection really is.

Materials Used

Friday, January 20, 2012

Christmas Day 2011 Mini Album

A mini album is a great way to use up scrap pieces of paper, ribbon, cardstock, and embellishments !
Here is a Christmas Day 2011 mini album I made using up the last of my October Afternoon Holiday Style DT pack...


And here are just a few detail shots of some of the pages. This was very quick and easy to put together, as I basically just stuck things down as I went, and once a page seemed "finished" or filled, I moved on to the next one.


The photos I have used are quite small. They are "contact sheet" and "passport" size from the Picasa program. The largest photo is wallet size !


As you can see above, I also showed no mercy to some of the word stickers - so that they fit on my pages, I cut them up !


The supplies for this mini are available from the Scraploot Online Store:

OA Holiday Style Papers - Deck the Halls, Ring-A-Ling, Merry & Bright
OA Holiday Style 12x12 Alpha Stickers
OA Holiday Style Journal Cards
OA Holiday Style Word Stickers
OA Holiday Style Miscellany Pack
OA Holiday Style Little Flyers
GT Jute - Ivory
MA Burlap String - Red
CI Organza - Dark Green with Swirls
Textured Cardstock - Crimson
Flat Cardstock - Kraft
Other: Ink, Dymo Labels, Kaisercraft Rhinestones.

Until next time - Happy Scrapping !

Wednesday, January 11, 2012

Step by Step with LYB–Head of the Class

Hello lovely blog readers…. today I am going to share with you a simple, yet effective step by step project using the Little Yellow Bicycle – Head of the Class Collection
Layout Ready to Learn Discover Grow
To complete this step by step, first pop on over to the Scraploot store and grab the following supplies;
Little Yellow Bicycle - Head of the Class Collection
Papers
Dot to Dot/Blue Study Hall
Geometry/Teal Test
Practice Yours ABC’s/Green Dot to Dot
- Alphabet Sticker Sheet
- Canvas Border Stickers
- Clear Cut Shapes
- Journal Cards
- Stick Pins
Other Materials
Textured Cardstock: White
Archival Ink: Jet Black
Doodlebug Simply Sweet Ladybug Cardstock Stickers
May Arts Twisted Burlap – Rust
Magic Mount
6mm & 12mm Xpress It Double Sided Tape
Xpress It Clear Gel Glue
Bella Sanding Block
1/2” circle punch
Step By Step
Take your Geometry/Teal Test Patterned paper, and using your trimmer, cut it to measure 8” x 9”. Ink the edges in the Archival Ink Jet Black. Adhere this piece to your Textured Cardstock White, approximately 1/2” in from the left edge of your cardstock and approximately 2” down from the top edge of your cardstock. Angle this piece up to the right.
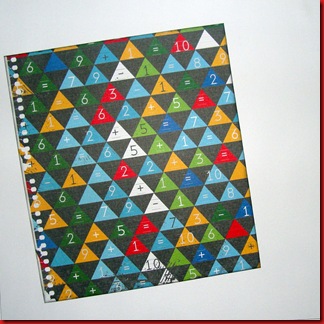
Step 1
Using your trimmer, cut a piece of Dot to Dot/Blue Study Hall patterned paper to measure 9 1/2” x 2”. Ink the edges in Archival Ink Jet Black.
From your Practice Your ABC’s/Green Dot to Dot, cut a strip of alphabet to measure 9 1/2” in length. Ink the edges in Archival Ink Jet Black.
Adhere the Alphabet strip from the Practice Your ABC’s/Green Dot to Dot patterned paper to the centre of your Dot to Dot/Blue Study Hall patterned paper. Now that these two pieces are together, take a pair of scissors and cut the right end to look like a banner as shown in the photograph below.
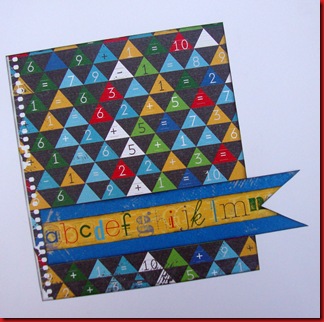
Step 2
Adhere this piece to your layout approximately 2 1/4” – 2 1/2” up from the  bottom edge of your cardstock, on the same angle as you place the Geometry/Teal Test patterned paper. Leave the “notebook” section of the Geometry/Teal Test patterned paper exposed.
Take your photo and using your Bella Sanding Block, distress the edges of your photo. Adhere your 6” x 4” Portrait photo approximately 3 3/4” in from the left edge of your layout and approximately 2” down from the top edge of your layout. Again, keeping it angled.
Finish of your layout by embellishing it the Clear Cut Shapes, Journal Cards, Stick Pins, Canvas Border Stickers and Twisted Burlap as shown in the photograph below. Below is a close up of the cluster of Journal Cards, Clear Cut Shapes and Stick Pins.
Cluster
Add your title using your Doodlebug Simply Sweet Ladybug Cardstock Stickers and Alphabet Sticker Sheet and journal onto your Journal Cards.
I hope you have enjoyed todays step by step, and if you do get to complete it we would love to see your version, so link it our Facebook page or send us an email.
Till next time,
Rachael

Friday, December 16, 2011

Girl, You're The Bee's Knees - Michelle

A girly page from me this week *gasp* !!!
Though I have used the beautiful blue papers from the Echo Park Time & Seasons Collection.
This is also "Version 3" of the very simple, Friday night scrapping layout...


This time, the pattern papers are vertical and on the right hand side of the page. And to keep things interesting, I have used a splattering of Tattered Angels glimmermist and a Martha Stewart border punch ! Both brands coming soon to Scraploot !


To brighten up the layout, and give it a more "girly feel", I've embellished with gorgeous red organza rosettes by Maya Road, and black twisted burlap by May Arts. The rosettes actually come as a trim, but I got creative and cut mine into individual flowers.


I've also used some fantastic 2Crafty chipboard on the layout. This timeless piece is one half of the Vintage Elise's Dress Form pack. I've kept it raw, to go with the kraft cardstock.
To kick off your weekend scrapping, you can find most of the supplies for this layout in the Scraploot Online Store ! Have a great weekend, and Happy Scrapping !

Materials:
Other:
Tattered Angels Glimmermist - Arctic Blue
Martha Stewart Border Punch