Saturday, May 12, 2012

More Authentique Cards...

I've never really been a card maker, but am loving the Authentique Genuine Collection for making simple friendship cards for everyone !
Here are a few more:


Grab the following supplies from the Scraploot Store to make these cards:

ASS Textured Cardstock - Vanilla
Kaisercraft Blooms - Buttercream
Kaisercraft Rhinestones - Silver
MA Twisted Burlap - Yellow
GT Coloured Jute - Ivory
Other: Ink, Martha Stewart Butterfly Punch

Happy Scrapping !

Monday, May 07, 2012

Precious Moments....


What a chilly start to May. After an average Summer, it looks like we are going to have a very cool Winter. Great scrapping weather if you ask me!

To get you in the scrapping spirit, today I bring you a step by step page to try yourselves.


To get started, head over to the Scraploot online store to pick up the following:

Cream rose flowers

Now let’s get you started…
1.       Using your cream cardstock, cut a photo mat in the middle of the page. Alternatively, purchase a second sheet and use that for your photo mat. Adhere magic mount to the back of your photo mount.
2.       Using the Jenni Bowlin Red Black Extension III Mamas Dress paper, ink the edges. Place on an angle leaving small bits of cream cardstock visible on each edge.
3.       Using the Jenni Bowlin Red Black Extension IV Multiplication paper, cut a piece from the black side measuring 17cm wide x 20cm high. Distress and ink. Place 3cm from the left hand edge of your card stock and 2cm from the bottom of your card stock.
4.       Using the Jenni Bowlin Red Black Extension IV Letter Chart paper, cut a piece10cm wide x 5cm high from the cream side. Distress and ink. Place 5cm from the left hand edge and 9cm from the top of your card stock.
5.       Using the Jenni Bowlin Red Black Extension IV Inkwell paper, cut a strip of red labels. Ink and place from one side of the page to the other, 3cm from the bottom edge of the cardstock.
6.       Using the Jenni Bowlin Red Black Extension IV Multiplication paper, cut a piece 14cm wide x 9cm high from the cream side. Distress and ink. Place 2cm from the right edge and 3.5cm from the bottom edge of the cardstock.
7.       Using the Jenni Bowlin Red Black Extension IV Pen Nibs paper, take the striped side and cut a strip 2.5cm wide x 28cm high. Distress and Ink. Place 0.5cm from the top edge and 7.5cm from the right edge of your card stock.
8.       Place a piece of red velvet ribbon down the length of the last piece of paper, approx 0.5cm from the right edge of it.
9.       From the Jenni Bowlin Red Black Extension IV Accessory Sheet, take the cream square with red patterned journaling block. Ink and mount on Magic Mount. Adhere 2.5cm from the right edge and 4cm from the bottom edge.
10.   From the Jenni Bowlin Red Black Extension IV Accessory Sheet, take a piece of the ruler strip measuring 10cm and ink. Place against the right hand edge and 4cm from the bottom edge of the cardstock.
11.   Place your photo and mount 5.5cm from the left edge and 12cm from the top edge of your cardstock.
12.   Taking a piece of black lace, place it under your photo mount from the left edge to the edge of the journal tag.
13.   Place a piece of red velvet ribbon and place along the top of the lace, extending all the way to the left hand edge of the cardstock
14.   Taking 2 butterflies from the Jenni Bowlin Alpha/red butterflies stickers, layer and place a piece of magic mount to raise it. Place on the right hand side of your journaling card. Finish with a small black pearl in the middle and a Jenni Bowlin red stick pin underneath.
15.   Create a flower cluster in the top left corner of your photo. Start with the black GT flowers on the bottom, the Red Jenni Bowlin red doily flowers on top and then the cream GT flower on top. Cluster in a group of three and finish with a black Jenni Bowlin decorative rhinesstone brad in the middle of the cluster.
16.   Finish your page with a title from the Jenni Bowlin chalkboard alpha stickers, lining them along the top corner angle of the page.


Happy scrapping!

xx Renae

Monday, April 30, 2012

Farewell April...


It’s hard to believe we are bidding farewell to April already. The month of public holidays, short work weeks and too much chocolate is over. 

To say farewell to April, I bring you some Prima inspiration to start the week, as we head into May and the colder months ahead (those great months where staying inside and scrapping is a much better idea!)

I have kept the photo as colour rather than changing it to black and white as the colours complemented the paper range so well. The pic is my mum and my adorable nephew on his Christening Day.


To get you started, you will need to visit the Scraploot online store and pick yourself up the following:


I hope you have enjoyed this week’s instalment. Stay tuned for more inspiration later in the week!

Until next week, Happy Scrapping!

xx Renae
Saturday, April 28, 2012

Authentique Genuine Cards

A couple of cards featuring the new CHA release - Genuine Collection by Authentique.
One for the boys, and then one for the girls !
Have a great weekend.


To make yourself some cute cards this weekend, grab the following from the Scraploot store:

Other: Ink

Happy Scrapping !

Monday, April 23, 2012

Welcome to Monday....

A new week is upon us and a short one at that. I'm still playing catch up at work, so scrapbooking is a welcome break at the moment! With a day off mid week, it's a great opportunity to sneak in some extra scrapping time!
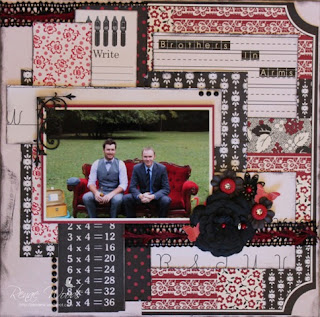
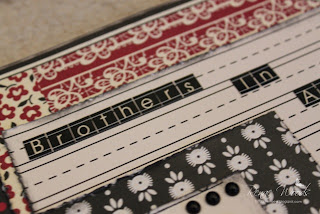
This week I am using the Jenni Bowlin Red/Black Extension range again. I love this pic of hubby and his brother on his brother’s wedding day. The red from the velvet lounge is a perfect compliment to this range too! I used a lot of different bits of left over scraps on this page.


To pick up the supplies for this page, visit the Scraploot online store.


Don’t forget to keep an eye out for more DT inspiration during the week and join in the 6th Birthday Celebrations!

Enjoy your week and Happy Scrapping!

xx Renae

Saturday, April 21, 2012

High School with A Boy's Life

Hi Everyone,
Apologies for such a late post...let's just say the holidays are keeping me busy !
Here is another great boy layout using the Echo Park A Boy's Life Collection.


To recreate this layout, you'll need the following supplies from the Scraploot Store:

EP A Boys Life Papers - Navy/Orange; Rambunctious; Suave
ASS Kraft Cardstock
LYB Head of the Class Banners 
LYB Head of the Class Stick Pins
PM Flower
Other: Ink, Dymo Labels, Doily, Maya Road Calendar, Brad

Until next time - Happy Scrapping !

Monday, April 16, 2012

A touch of red black and white...

A new week is upon us. It's hard to believe we are already half way through April!

This week I bring you some more of the lovely Jenni Bowlin range. This range works so well with so many of my photos at the moment! My adorable little munchkin nephew features again this week, along with my beautiful sister (also his god mother). I went crazy with the layering in this one!


To pick up the supplies for this page, visit the Scraploot online store.


Here are a few more close ups for you...


I hope you've enjoyed this week's installment from me. Don't forget to keep your eyes peeled this month... It’s oScraploot's 6th birthday, so don’t forget to check out the specials and the sketch challenge is still on, so get scrapping and have a go.

Enjoy your week and Happy Scrapping!

xx Renae

Friday, April 13, 2012

Happy Friday !

Yay ! It's the weekend.
I hope you have the chance to scrap, scrap, scrap !
Here is my interpretation of the April monthly sketch, using my absolute favourite collection yet -
A Boys Life by Echo Park.


To make this layout, from the Scraploot store you will need:
EP A Boys Life Paper - Energetic, Hot Rod, Rambunctious, Suave
EP A Boys Life 12x12 Alpha Stickers
ASS Kraft Cardstock
2Crafty Chipboard
Other: Ink, PP Journal Card, LRR Button

Happy Scrapping and Have a Great Weekend !

Monday, April 09, 2012

A beautiful day for Prima…

Hopefully you’ve all been able to fit in some scrapping time over the long weekend! I’ve been spring cleaning our bedroom cupboards and celebrating hubby’s birthday, so the scrapping time has been minimal but productive.

This week I showcase you some Prima goodness again. I am having a blast with this paper and the wedding pics from my brother and new sister in law’s wedding.

I haven’t used multiple pics in a while but wanted to capture these 2 individual shots of them on one page. I cut down two 6”x4” ones that I had already printed to save wasting them.


Don’t forget to check out the Scraploot online store and pick yourself up the following supplies for this page.

Cardstock – Sand 
BI Guipure Lace - Cream
Jenny Bowlin Stick Pins - Cream
Jenny Bowlin Doily Flowers - Cream
Jenny Bowlin Chalkboard Alpha Stickers - Black
Kaisercraft paper blooms
Kaisercraft Pearls – Chino
SI Magic Mount White
XP 6mm Double Sided Tape
XP Clear Gel Glue
Prima – Ingvild Bolme Chalk Ink
Tim Holtz Distress Crackle Paint
Miscellaneous shipping tag & brown journaling pen

Enjoy the rest of the week and don’t forget to have a go at the great sketch challenge happening on the blog at the moment.

Happy Scrapping!

xx Renae
Friday, April 06, 2012

Good Friday...

I hope that whatever you have been doing on this glorious Good Friday, you have had a wonderful day.
I would like to wish all of our Scraploot family a fabulous Easter, and hope that you have a great time with family and friends. Please stay safe over this Easter long weekend too !

Big Boy Toys is my latest layout using the awesome A Boy's Life Collection by Echo Park.


You can find most of the supplies for this layout at the Scraploot store:

Other: Little Red Rocket Button; A Lil' Somethin' Butterfly Pin, Brads

Monday, April 02, 2012

Munchkin....

As you can probably figure, I simply can’t go past a photo of my adorable nephew and what a great opportunity with this gorgeous Jenni Bowlin range. This week I bring you a simple step by step page to have a go at.
You will need to head over to the Scraploot online store first to pick up the following:


Now let’s get you started….. 
1.       Using your black cardstock, cut a photo mat in the middle of the page. Alternatively, purchase a second sheet and use that for your photo mat. Adhere magic mount to the back of your photo mount.
2.       Using the Jenni Bowlin Red Black Extension IV "Accessory Sheet" cut a piece from the red dot side measuring 15cm wide x 6cm high. Distress and ink. Place 2cm from the left hand side and 4cm from the top of your cardstock.
3.       Using the Jenni Bowlin Red Black Extension IV "School Dress" sheet, cut a piece from the text side measuring 25cm wide x 20cm high. Distress and ink. Place along the right hand edge of your card stock and 3cm from the bottom of your card stock.
4.       Using the Jenni Bowlin "Lacy Border" paper cut a strip 29cm wide x 5cm high. Distress and ink. Place along the right hand edge of your card stock and 6.5cm from the bottom of your card stock.
5.       Using the Jenni Bowlin Red Black Extension IV "Accessory Sheet”, take the red/cream rectangle part and cut a piece 14cm wide x 6.5cm high. Ink. Place 1cm from the right hand edge of your card stock and 6cm from the bottom of your card stock.
6.       Using the Jenni Bowlin Red Black Extension IV "Multiplication" sheet, cut a piece 13cm wide x 3cm high from the black side. Distress and Ink. Place along the right hand edge of your card stock and 5.5cm from the top of your card stock.
7.       Place your photo 7.5cm from the left hand edge and 9cm from the bottom of the cardstock.
8.       Ink the 2Crafty chipboard pole and cut in half. Place either half along the left hand and bottom edges of your photo map, leaving approximately 1cm gap from the mat. Place rhinestones along chipboard. 
9.       Create your photo cluster in the bottom left hand corner of your photo mat. Take 2 large black flowers and layer. Place a large red flower just off centre of the black ones. Layer black plastic flower directly on top of red one. Place red pearl trinket through mini cream flower and adhere flower to middle of black plastic one. Taking 3 cream medium flowers, scatter under the larger flowers to create a fan effect.   
10.   Take a piece of black string and create a loop effect along the right edge of your photo. Fasten to page with staples. Place 2 butterfly stickers near the loop joins with magic mount. 
11.   Create your title with the letter stickers. Finish with a coat of Glossy Accents to create an epoxy look to the letters. 
12.   Finish your page with journaling and a coat of Glossy Accents on your chipboard.
I hope you have enjoyed this week’s page. Stay tuned for more DT work throughout the week and have a go at the April sketch challenge while you are at it!

Happy scrapping!

xx Renae