Saturday, December 31, 2011

Santa Photo - Michelle

Not long now and we will be ringing in the New Year.
2012.
Can you believe it ?
From all of us here at Scraploot... HAPPY NEW YEAR !
Have a great night, whatever your plans.
And now back to scrapping:


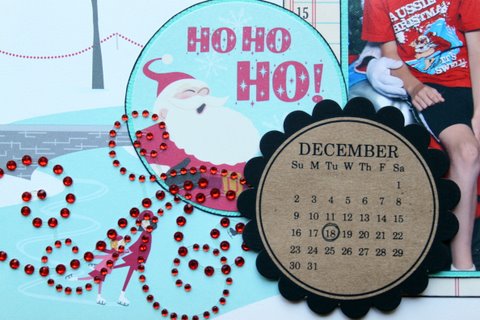
This is our 2011 Santa Photo, and what an easy photo to scrap using October Afternoon Holiday Style. I didn't really add much to this layout - the OA City Sidewalks did the hard work for me!


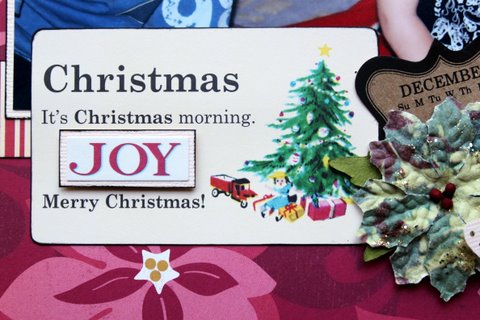
A little bling always looks good on a Christmas layout, and this Zva Creative - Flourish is no exception. I was impressed with how easy it was to use this flourish and remove it from the backing plastic!


It may not snow here for Christmas, but these diecut flakes made a quick and attractive addition to the page. I popped them up with Magic Mount, and as you can see, it added to the overall effect. I also cut up some longer stickers and traced around them to go with the dymo label title.


IMPORTANT TIP: If you intend to submit layouts for publication using professional photographs, you must first seek permission from the photographer and/or company - it's all about copyright ! You should also give credit to the photographer and /or company when displaying layouts in galleries, on blogs or the internet.
Our 2011 Santa Photo is courtesy of "Scene Too Believe", Chatswood NSW.

The Scraploot Online Store is having a 20% off EVERYTHING sale, so why not grab some October Afternoon Holiday Style for a bargain price and scrap that Santa Photo!

Supplies:
OA Holiday Style Papers - City Sidewalks and Ring-A-Ling
OA Holiday Style Word Stickers
OA Holiday Style 12x12 Alpha Stickers
OA Holiday Style Miscellany (Snow Flakes)
Textured Cardstock - Robins Egg
Zva Lovely Red Crystal Flourish
SI Magic Mount
Other: Ink, MR Calendar, Dymo Label

Happy New Year and Happy Scrapping!

Friday, December 30, 2011

December 25th - Michelle

With Christmas done and dusted and the New Year just around the corner, now is the perfect time to get scrapping all those Christmas pics! And what better range to use than October Afternoon Holiday Style...


December 25th is a layout showing Jacob & Caden on Christmas morning about to unwrap all of their presents from Santa Claus! My favourite embellies on this page would have to be the gorgeous Prima Holiday Flowers and the October Afternoon Holiday Style Little Flyers - they're so cute!


All of the supplies needed for this layout can be found in the Scraploot Online Store, which has 20% off the entire website until 8th January 2012 - don't miss out on a bargain!
You will need:
OA Holiday Style Paper - Feliz Navidad
OA Holiday Style 12x12 Alpha Stickers
OA Holiday Style Word Stickers
OA Holiday Style Miscellany (Santa Claus)
OA Holiday Style Little Flyers
Green Tara Jute - Ivory
Cardstock Textured - Vanilla
Prima Holiday Flowers - Crimson
Other: Ink, MS Butterfly Punch, MR Calendar

I hope you had a wonderful Christmas, and I look forward to seeing a lot of Christmas layouts in the coming days and weeks.
Happy Scrapping!

Monday, December 26, 2011

Christmas Day Festivities!!


Morning all, Renae here...I hope you all had a wonderful Christmas Day. Before you all ask, no I’m not some insane super woman, I prepared these pages ready for the photos a few days ago lol!

I went all out with the first one for a festive feel. The pic is my hubby and our ever adorable nephew.
I haven’t used Crackle Accents for a while and thought it worked well with this chipboard.

I’ve added a few close ups for you as well….


With the second one, I kept a very basic feel and wanted to focus on the photo. We gave our nephew a cute little blue rubber duck and then he wouldn't let it go! Forget the rest of the presents after that!


And a quick third one for you as well....another festive feel using the scraps from the last 2 pages and a full sheet of paper as the base instead of cardstock. Yep the gorgeous nephew again.... his mum propped him up in front of the tree and he sat posing for the paparazzi in his Santa hat!


To stock up on these products to recreate this page, head over to the Scraploot online store.


Hopefully that has started your inspiration for your Christmas happy snaps. Don’t forget to keep an eye out for more ideas from the rest of the Design Team throughout the week!

Happy Scrapping.

Xx Renae

Friday, December 23, 2011

1940's Family - Michelle

Hi Everyone !
This is my final Echo Park - Time & Seasons post, and it's my turn for a step x step.
Whilst it's not a Christmas layout, it is all about FAMILY.
It's also one for all you heritage scrappers and genealogists out there :)

Supplies you'll need (which can be found at the Scraploot Online Store):
Echo Park Time & Seasons Patterned Papers
- PP1 Yesterday's News
- PP2 Astoria
- PP3 Lovely Notables
- Journal Cards
Echo Park Time & Seasons Element Stickers
Echo Park Time & Seasons Alpha Stickers
Textured Cardstock - White
Kaisercraft Paper Blooms - Olive
Green Tara Flowers - Rust
2Crafty Chipboard - Decorative Border Pole
XPressIt Double Sided Tape
Magic Mount
Pritt Glue
Other: Dymo Labels; Ink; GlimmerMist


Step 1: Choose a base paper or PP1. I have used Yesterday's News.


Step 2: Cut a 30cm x 15cm rectangle using PP2. I have used Astoria. Mount the rectangle on the cardstock, so there is a border of a few mm all the way around. Ink both paper and cardstock if desired.


Step 3: Cut a 13cm x 19cm rectangle using PP3. I have used Lovely Notables. Mount the rectangle on the cardstock, so there is a border of a few mm all the way around. Ink both paper and cardstock if desired.


Step 4: Mount your photo on cardstock, leaving a border of a few mm all the way around. Ink both photo and cardstock if desired. My photo measures 9cm x 13cm. You would adapt the measurements in Step 3 if your photo was larger.


Step 5: Adhere PP2 to PP1 (base) approximately 5.5cm from the top of PP1.


Step 6: Adhere PP3 to PP2 approximately 4cm from the left hand side of PP1, and so the overhang is about the same at the top and bottom of PP2.


Step 7: Adhere large Green Tara Flower to the bottom right hand corner of PP3. Adhere photo to PP3, so that the bottom right hand corner of photo is in the centre of the large flower.


Step 8: Adhere remaining Green Tara Flowers in a cluster. (I played with the colour of my Green Tara Flowers by applying some GlimmerMist in a coffee colour).


Step 9: Adhere Kaisercraft Paper Blooms in another cluster, on top of the Green Tara cluster.


Step 10: Add the Time & Seasons Element Sticker - Old Car and Journaling Tabs. Use Magic Mount under the top journal tab.


Step 11: Add the 2Crafty chipboard as shown. I have inked mine with Pinecone Ink.


Step 12: Add the Time & Seasons Alpha stickers for the title, and the element stickers of your choice. I have used the camera; printed flower; and Family Time banner. Make these pop with Magic Mount, after backing with cardstock. If you don't have a Dymo Labeller you could use mini alpha stickers.


Step 13: Add your jounaling. Remember if you're doing a heritage page, to add as much accurate information as you can !


And you're done...


As you can see, there are not too many steps involved, so perfect for this busy time of year !
Wishing you all a very Merry Christmas, and if you are about...keep visiting the blog as we showcase some gorgeous new Christmas ranges that you can use for all those Chritmas photos you're going to take !!!

Happy Scrapping xxx

Wednesday, December 21, 2011

'Head of the Class' Collection Papers graded an A+ in awesomeness!

Hi everyone, Ruby here with an A4 sized layout made with Little Yellow Bicycle- Head of the Class collection papers. You can find all of these delicious products right at the Scraploot store
The backround page is LYB Head of the Class Bookwork paper with Penmanship (the design on the back of this paper) used as the scalloped border underneath the photo matte. LYB Head of the Class Bus Stop/Pencil it in paper was used to mount the image, as well as ASS Textured Cardstock in white. For the embellishments, Little Yellow Bicycle's lovely matched Canvas Border Stickers and Clear Cut Shapes did the trick, with the Journalling Spots proving as a perfect addition to my page.
As you can see on this page- I used pencils. That's right dear readers- real pencils 'borrowed' right from the household's pencil case! Using Pritt All Purpose Glue 40gm I adhered them straight to the page. This glue is perfect for these kinds of embellishments, ribbon also! I definately suggest you invest in this product- you will not be let down; I assure you!
I hope your week is treating you well and your Christmas shopping is all done! 
Have a wonderful weekend, Merry Christmas to you all! x

Tuesday, December 20, 2011

Baby Steps

So today’s quick share is a using a collection we have had in store for a little while now, Baby Steps Collection by Simple Stories. It is an adorable baby collection with great versatility for boy and girl pages, or even for baby shower present as is also quite neutral with greens and yellows, with creams and browns for the bases of each of the patterned papers. For the two layouts below, we have used the same sketch, and even some of the same papers, just used different element stickers to create the two different layouts.

Sue SS Baby Steps Girl

Materials Used:

Swiss Dot Cardstock Salt

Baby Steps Fundamentals Cardstock Sticker Sheet

Baby Steps Collection Papers

- Sweet Dreams

- So Precious

- 100% Perfect

2 Crafty Chipboard Flourish 2

Archival Ink – Sepia

Jumbo Sponge Dauber

Martha Stewart Border Punch

Green Tara Cream Flowers 5cm & 7cm

SUE SS Baby Steps Boy

Swiss Dot Cardstock Salt

Baby Steps Fundamentals Cardstock Sticker Sheet

Baby Steps Collection Papers

- So Precious

- 100% Perfect

- Totally Adorable

Archival Ink – Sepia

Jumbo Sponge Dauber

Martha Stewart Border Punch

That’s it from us today… but be sure to stop by the store and check out what’s arrived this week… Zva, October Afternoon – Holiday Style & Echo Park – Yours Truly…. Click HERE to go straight to our New Arrivals section.

Monday, December 19, 2011

Where has the time gone? Christmas is almost here!

Welcome again to a new week! Hopefully you can all find some scrapping time over the holiday season.
I’m loving this Basic Grey range! This week I have just used scraps of paper and embellished areas with the element stickers and die cut shapes. It gives the page a fuller look, yet I haven’t used that much paper.
 
It’s rare to get a photo of my parents with Dad actually being serious long enough to get a good photo! I love this one of them at a recent family friend’s wedding we went to. It took 3 takes, but third time was a charm! The colours also blend well with the papers I chose for this page.

I've captured a few close ups of some of the detail for you too....


Head over to the Scraploot store to pick up the following supplies for this page and a few extras to get you through the holidays! 

Basic Grey Little Black Dress Tissue Flowers
Basic Grey Little Black Dress Metal Flowers
Basic Grey Little Black Dress Paper Shades of Grey  
Basic Grey Little Black Dress Paper Etiquette
ASS074 White Textured Cardstock 
Green Tara Black Flowers
Green Tara Cream Flowers
Kaisercraft Paper Blooms Coconut 
Kaisercraft pearls
GT Lace White L2853W 
SI Magic Mount White
Pritt All Purpose Glue 40gm 
XP 6mm Double Sided Tape

Don’t forget to keep an eye out for Ruby & Michelle’s design work for you later in the week. Merry Christmas to you all and happy scrapping! 

xx Renae 

Friday, December 16, 2011

Girl, You're The Bee's Knees - Michelle

A girly page from me this week *gasp* !!!
Though I have used the beautiful blue papers from the Echo Park Time & Seasons Collection.
This is also "Version 3" of the very simple, Friday night scrapping layout...


This time, the pattern papers are vertical and on the right hand side of the page. And to keep things interesting, I have used a splattering of Tattered Angels glimmermist and a Martha Stewart border punch ! Both brands coming soon to Scraploot !


To brighten up the layout, and give it a more "girly feel", I've embellished with gorgeous red organza rosettes by Maya Road, and black twisted burlap by May Arts. The rosettes actually come as a trim, but I got creative and cut mine into individual flowers.


I've also used some fantastic 2Crafty chipboard on the layout. This timeless piece is one half of the Vintage Elise's Dress Form pack. I've kept it raw, to go with the kraft cardstock.
To kick off your weekend scrapping, you can find most of the supplies for this layout in the Scraploot Online Store ! Have a great weekend, and Happy Scrapping !

Materials:
Other:
Tattered Angels Glimmermist - Arctic Blue
Martha Stewart Border Punch