Firstly, you will need to head over to the online Scraploot store to get you started with your supplies.
Here is the finished product…
Now to get you started…
1.
Start with your cardstock for your base. You
will need to ink the edges of this and cut a 6 ¼ x 4 ¼ inch photo mat from the
middle of it (or purchase 2 sheets to save you having to cut into the base
sheet). Foam mount your photo mat.
2. From the heart side of the “Sweetheart” paper,
cut a 19cm x 19cm square. Distress and ink. Place 4cm from the top and 2cm from
the right edge of the cardstock.
3. From the dotted side of the “Adore”, cut a piece
9cm wide x 18cm high. Distress and ink. Place 2cm from the left and 2.5cm from
the bottom edge of the cardstock.
4. From the black swirl side of the “Smitten”
paper, cut a piece 2.5cm wide x 5cm high. Distress and ink. Place 2.5cm from
the right and 15cm from the top edge of the cardstock.
5. From the pink side of the “Newsprint” paper, cut
a piece 6cm wide x 7.5cm high. Distress and ink. Place 2.5cm from the right and
3cm from the bottom edge of the cardstock.
6. From the dotted side of the “Adore”, cut a piece
13cm wide x 7cm high. Distress and ink. Place 8cm from the right and 2.5cm from
the bottom edge of the cardstock.
7. From the dotted side of the “Crush” paper, cut a
piece 5cm wide x 11cm high. Distress and ink. Place 4cm from the right and 14cm
from the top edge of the cardstock.
8. From the “Journal Cards” paper, cut the red
bracketed card with the text around it. Ink the edges. Place 4.5cm from the
right and 9cm from the top edge of the cardstock.
9. From the pink side of the “Smitten” paper, cut a
piece 5.5cm wide x 29cm high. Distress and ink. Place 5cm from the left edge
and place against the bottom edge of the cardstock.
10. Using the black lace, cut a 20cm piece of lace. Place
along the bottom edge of the papers. Align with the left edge of your dotted
piece from step #3.
11. Take the city skyline from the sticker sheet and
place above the lace.
12. Place your photo mat above this sticker
(approximately 6.5cm from the left and 11.5cm from the top edge of your
cardstock).
13. Using foam mount, take your large white Bella
flower and place 2 steps of magic mount on it. Place on the bottom left corner
of your photo. Taking 2 pink Green Tara flowers, tuck slightly underneath
either side of your white flower. Finish the cluster with 2 2Crafty flourishes.
Ink and finish with Glossy Accents.
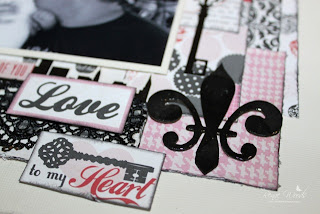
14. Using your fleur de lis chipboard, ink and place
in the bottom right corner of the paper from step #9. Finish with glossy
accents.
15. Taking your sticker sheet, use the key and place
down the right side of your photo. Taking the “All Because of You” sticker,
place on the right hand side of your flowers. Take the grey ticket and journal,
placing it on the top left edge of your photo.
16. From the “Journal Cards”, cut out the “Love” and
“To my heart” rectangles. Ink the edges and foam mount. Staggering them, place
underneath your photo.
17. Finally, back to your sticker sheet, take the “I
will always love you” shaped sticker. Mount with foam mount and place to the
top right of your photo.
And some close ups to help you out…
And for those scraps, yet another super quick card for you…
a strip of paper, some stickers and floral trim! How easy can you get!
Enjoy your week and don't forget to have a go at the sketch challenge and check out the pre order discounts on offer!
Happy scrapping!
xx Renae


No comments:
Post a Comment